Zone entries are very important to the efficacy of a team’s offense. It is commonly held that carrying the puck into the zone leads to more shots than dumping the puck in and trying to recover possession. While I have tracked the zone entries for the Chicago Blackhawks as the season has worn on, I have not done so for the Tampa Bay Lightning. Because of that, I thought we could look at the systems each team uses to gain the offensive zone and discuss the players to keep an eye on in this part of the game instead of going too heavily into zone entry statistics.
BREAKOUTS
Breakouts are the plans a team uses to get the puck from the defensive zone into the offensive zone. This happens in two distinct situations. The first is when the opponent has been on the offensive attack and the defending team works to regain possession and quickly move the puck out of the zone. The second occurs when the defending team regains possession of the puck, but holds it behind the net to allow for line changes prior to starting out of the zone. This second situation is referred to as a “controlled breakout”.
Breakouts that happen on the fly (the first situation referenced above) have a fairly standard set of plays used by teams throughout not only the NHL, but hockey in general. When you hear the defenseman without the puck yelling “UP” or “WHEEL” (among others) to his defense partner, he is calling out the breakout play to be used. D2’s read of the pressure from the attacking team is vital to executing the breakout. D1 is often gathering the puck with an opposing player all over him or at least right on his heels so he does not have much time to look around.
Goaltenders have more involvement in these types of breakouts because often the puck reaches the goalie before the other players, particularly when it is dumped into the zone. Reading the pressure coming from the opposing team is very important when deciding which breakout to use. Goalies often fall prey to leaving the crease to play the puck only to have a forechecker breathing down their necks. This leads to the goalie simply throwing the puck up the boards to get it away from the net. Unless the goalie is very skilled at placing the puck where he wants it, a board battle ensues for possession or the defenseman manning the point collects the puck and shoots it on net in an effort to take advantage of the goalie having to scramble back into position.
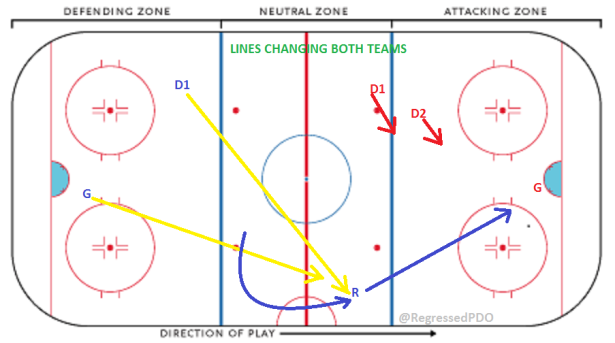
Ben Bishop, Tampa Bay’s goalie, is very active on breakouts and often completes a stretch pass to a forward high in the neutral zone on the far boards while the teams change personnel. Defensemen defending against a dump in during a line change also use a stretch pass to a forward wide to take advantage of the lack of defensive coverage.
To avoid this, the player dumping the puck must make sure the puck gets deep into the zone. Goalies like Bishop will often just go fish the puck out from behind the net and use the stretch pass anyway, so Chicago will need to be ready to counter this.
Zone exits are very important to getting the offense going. The first pass in the defensive zone on the breakout is crucial to getting things moving. Chicago and Tampa Bay have both had struggles with sloppy passing on breakouts that has led to their opponents regaining possession.
LANE AND MOTION REGROUPS
Both Chicago and Tampa Bay use Lane Regroups and Motion Regroups to get their attacks refocused. A Lane Regroup is only different from a Motion Regroup in that the Center does not switch spots with a Wing like he would be permitted to do on a Motion Regroup. Tampa Bay used Lane Regroups against Montreal when the Canadiens had one forward in the zone to forecheck, i.e. used a 1-2-2 neutral zone forecheck. When Montreal used 2 forwards to pressure the regroup, Tampa Bay was forced to use more Motion Regroups. When line changes are made during regroups, the options become more open. Both Chicago and Tampa Bay take advantage of this.
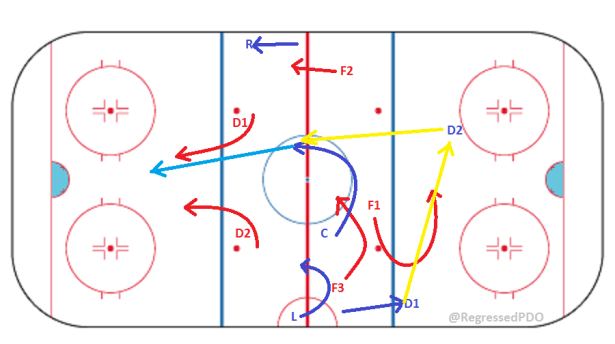
Lane Regroup
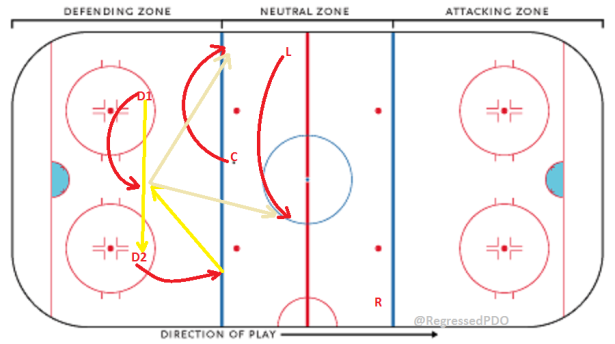
D1 gets possession of the puck and carries it back into his defensive zone. He passes to D2 while each forward occupies the lane associated with his position. R (Right Wing) is closer to the opponent’s blue line to provide a Quick Up option. L (Left Wing) and C (Center) swing lower in the neutral zone and gain speed turning back up ice. In this illustration, D2 passes to C as he speeds toward the offensive blue line. Players with good hands may be able to split the D on the way into the offensive zone and gain a clear path to the net.
Motion Regroup
Motion Regroups create a lot of movement in the neutral zone and because they nearly always start out looking the same way, they cause confusion among the players defending it.
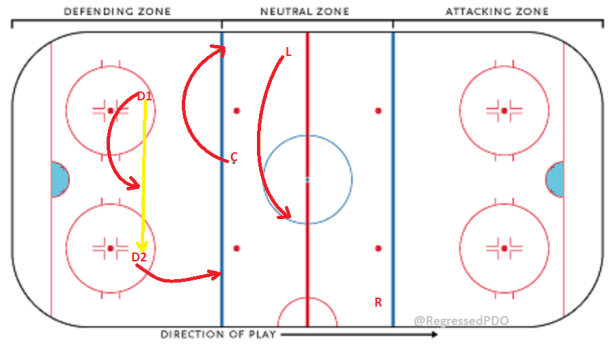
Basic Motion Regroup – Starting Formation
R posts up near the offensive blue line ready for a stretch pass. C and L swing in opposite directions from their lanes. D1 passes to D2 and then swings toward a mid-ice position. D2 skates toward his blue line reading the coverage. At this point, D2 has several options, some of which include making a pass to L or R (D to D Stretch) or skating farther into the neutral zone and making a flat pass (parallel with blue lines) to C.
Another option for D2 is to pass the puck back to D1 to execute a Hinge Play as shown below.
When using the Hinge, D1 has the option to pass to C or L who should have built up considerable speed at this piont. The key to these types of plays is to execute them quickly so that the forwards do not stagnate in the neutral zone. Speed coming into the offensive zone is essential so D2 must read the coverage quickly and make a decision. Adding D1’s decision into the mix such as with the Hinge play, only increases the pressure, but if D1 and D2 are good passers and quick decision makers, this play works very well.
One more option that both Chicago and Tampa Bay have used involves this same set up, but instead of R remaining posted up near the boards, he cuts across the ice parallel to the offensive blue line, providing yet another moving target for D2.
*Chicago Note: Because of personnel issues this season, the defensive pairings have been inconsistent and at times, ineffective on regroups and breakouts. Much of this draws from the changes in the defensive pairings. Keith, Seabrook and Oduya are the most proficient passers on Chicago’s defense. When Keith and Seabrook were together, Keith served as D1 with Seabrook as D2. Losing Keith as his partner forced Seabrook to carry much of the load in terms of reading coverage and setting up breakouts and regroups. The Hinge option virtually disappeared for Seabrook’s pairing as a result of this as well. This is an interesting topic that I plan to expound upon after the season concludes so keep an eye out for that.*
ZONE ENTRIES
Entering the offensive zone following a breakout or regroup is organized and often happens when the opposing forecheck is established. When we get into “end to end” action situations, the task of getting the puck from the defensive zone to the offensive zone becomes far less structured and reliant upon creativity and speed.
Controlled Entries:
Chicago – Saad, Kane, Teravainen
Tampa Bay – Killorn, Palat, Stamkos
The players listed above are extremely dynamic through the neutral zone whether due to strength, speed, puck handling or a combination thereof. Of course, both teams’ commitment to carrying the puck into the zone makes nearly all of the players a threat to do so, but each line has a few players that generally bear the responsibility for getting the puck into the zone. Because Chicago’s defensive pairings have been so chaotic, they probably won’t try to carry it in during even strength play very often. Conversely, Tampa Bay’s defensemen have a green light to carry the puck in virtually all the time.
Dump Ins:
Depending on what the coaches draw up in terms of neutral zone forechecking, dumping the puck into the offensive zone will likely be a last resort option. When it does happen, Chicago fans can expect to see something much different than the forecheck used by Anaheim to retrieve the puck. Anaheim specialized in using hitting to pressure Chicago’s defensemen into making poor decisions with the puck. Tampa Bay is likely to use speed to this instead. Tampa Bay’s forwards use extreme speed and tenacity to retrieve the puck even on dump ins that most teams would concede possession on.
Chip & Chase:
Because each team has a few defensemen that are very good at standing players up at the blue line, the chip and chase will become more important. Patrick Sharp, Steven Stamkos and others are really skilled at doing this. If you watch these players when they realize they need to chip the puck in, they will make a move to draw the defenseman off the boards a bit, then chip it off the boards in behind the coverage. Even if the player doing the chipping gets held up by the defending player, he should have another forward close by speeding toward the area the puck is moving in support.
A few Chicago players, namely Saad, Hossa and Sharp are also quite good at chasing down a puck dumped out of their defensive zone. When a player along the boards is able to propel the puck out of the defensive zone, watch for these players to chase the puck down while the opposing defenseman scrambles to gather it up.
Tampa Bay, at least during the series against the Rangers, relied so heavily upon this type of play, that it is hard to think it wasn’t by design. The dump out of defensive zone by one of Tampa Bay’s players has been along the boards fairly often with one of the forwards pursuing the puck, i.e. not allowing the opponent to start their regroup, like a bat out of hell. In Game 7 versus the Rangers, Tampa Bay forwards were able to chase down pucks that had been dumped out of the defensive zone at least 10 times at even strength. Without context that may not seem very important, but given the other tracking I’ve done, this is truly an astoundingly high number. Chicago’s defenseman will need to be on their toes and ready for this to happen or they will end up with an unpleasant surprise.
Offensive Differences:
Chicago has a reputation for getting their defensemen involved in the offense. During the playoffs, because of personnel issues, Chicago defensemen have not been very aggressive low in the offensive zone. They still pinch along the boards to keep the play alive often, which compared to other teams around the league, is fairly aggressive.
Tampa Bay’s defensemen will play the puck low in the offensive zone on the regular. They are practically interchangeable with the forwards on most offensive possessions where the team is trying to drive the net or cycle down low. Because of this, if their opponent is able to gain possession of the puck and quickly skate or pass it out of the zone, there is only one defenseman back to defend with a forward struggling to hold his position defensively and has led to oddman rushes often.
This could be a big key to the series for Chicago. Chicago’s transition game, Tampa Bay’s as well, is known for speed. This speed comes not just from skaters, but from passes out of the defensive zone that spring the offense. If Chicago can take advantage of Tampa Bay often having a forward working high in the zone while a defenseman is low, their chances off the rush, particularly oddman situations, will be very dangerous.
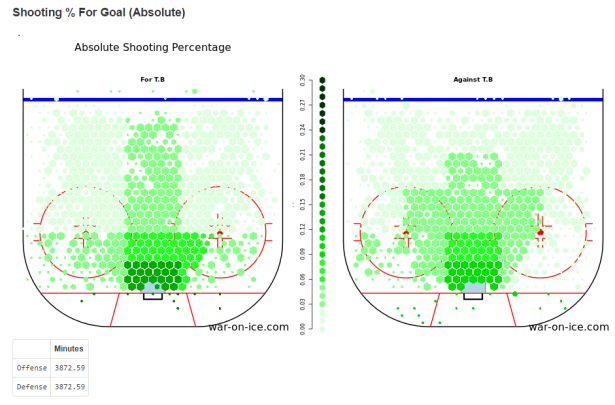
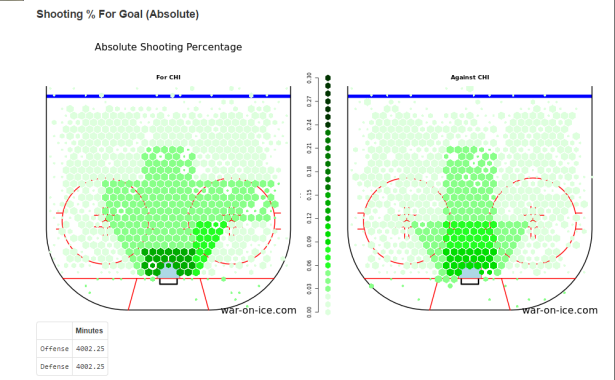
Below are the Hextally maps for Tampa Bay and Chicago over the season courtesy of http://www.war-on-ice.com.
Tampa Bay
Chicago
Seeing how the For and Against graphics for each team are mirror images, it should be interesting to see how this match up turns out.
2 thoughts on “Stanley Cup Final Systems Look: Gaining the Offensive Zone”